Smalerie Attempts Nail Art
If you follow any of the Ladies on social media, you'll notice that we are having our second View and Chew event coming up in a couple of weeks. This event is going to be even more crazy than our last as we prepare to celebrate all things Supernatural. As part of our preparations, we have been making prizes, choosing the perfect plaid clothing items to wear, and having extremely detailed conversations about the best way to paint demon traps on everything from our toilets to our own finger nails. As someone who really likes to theme her nails in line with various Comicazi and Ladies' events, it seems only natural that I am not only prepping special nails for our event, but have been experimenting with the best way to create theme-appropriate nails for future events as well. And as I suffer from all this trial and error (and acetone fumes), I am going to share with you what I have learned. PS - If you are dying to see the finished product, you should really get your tickets to our event, or follow me on Twitter or Instagram (Krebstar5) if you are not local. The Goods - Believe it or not, I don't feel like I have enough nail supplies. As soon as I hit a stride with something, I discover something else that I REALLY want. Also, I never seem to have enough colors and random things to glue to my nails. My last practice session looked like this:

While I will say that most of this is optional based on what you like to do, I will share with you the one item that has seriously upped my nail art game - a silicone mat. There are a lot of versions out there, but the ones I ended up going with is the Bliss Kiss Simply Neat Miracle Mat. It is one of the more expensive ones out there, but I love how thick it is and that fact that it has a little wall around it to protect my tables from spills. If you are interested in this mat or something like it, it can be found on the Simply Bliss website directly and also Amazon.
General tips before you start: Invest in a quality base and quick dry top coat. Right now my favorites are Essie's Grow Stronger Base Coat and IMN's Out The Door Fast Drying Top Coat. While there might be better products out there, these have both been working well for me and are easily found at drug stores, Target, and online.

Technique 1: Stamping (see pinky finger)
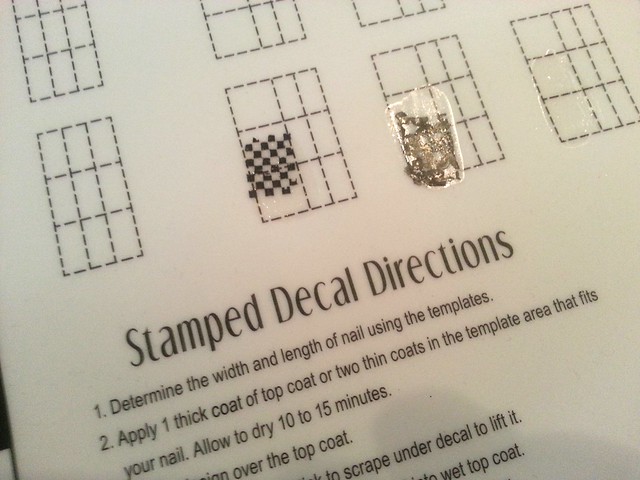
This method involves applying polish to a metal plate before lifting the image up with a stamper in order to transfer the image directly to you nail. If you ask me, stamping is the fastest route to madness. I can NEVER center them properly and the patterned ones are never wide enough to cover my full nail. To add insult to injury, no matter how much I practice and use the special stamping polish, the stamper still rarely picks up the entire image. I have scoured the internet for tutorials and tips but find myself making little progress. Basically there are just so many elements that can go wrong from not having a proper scraper, cheap plates, and too stiff a stamper that I feel the cards might be too stacked against me at this point. The one thing that I have found to really help me is the nail mat I mentioned earlier. With the mat, I can stamp the image directly on some clear polish that I've applied to the mat and create decals that are really easy to just stick on the nail with some more clear polish. So while I am not that ready to make the deep dive into stamping, I wouldn't say that is it completely off the table. Especially when there are so many amazing stamping plates like this out there. Jiji, you will be on my nails someday! I promise!
Technique 2: Nail Vinyls (thumb and middle finger)
Nail vinyls are essentially vinyl stencils that you stick on your nails. You apply your polish directly over the stencil and carefully pull it off before the polish has a chance to dry. These are my latest discovery and potential obsession. From my feeble attempts pictured, you can see that things can either go horribly wrong, or SO right. The learning curve here doesn't seem to steep though it does require a lot of patience to make sure that your nails are completely dry before applying the vinyls and that you are pulling them off at an angle that both keeps the design clean but keeps the pulling action up and away from the design. My preferred brands are from Twinkled T and the Kiss Nail Artist Stencil Kit. The stencil kit is a great starter for those who are just trying this out. The little stickers pull away easily and the pack comes with some fun nail colors to get you started. My only gripe is how small the designs are. Twinkled T is great for varied and larger designs and their vinyls have some serious (almost too serious) sticking powers. It will take a few tries to get this right (as you can tell by some of the more messy examples above), but the results can be very impressive.
Also in this category are full nail vinyls (or wraps) that completely cover your nail and stay on. There is no drying time, they stay on for weeks, and come in some really amazing designs. Jamberry makes a wonderful product that you can apply at home, but they do require quite a bit of practice to get them right. I would use these all the time, but they require a heating element to apply them and can be surprisingly expensive. The first issue can be solved with a space heater or hair dryer, the other well...I guess you have to pay for quality.
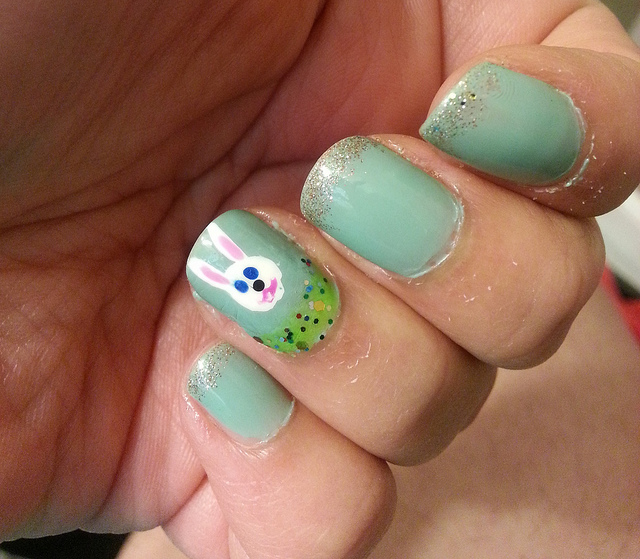
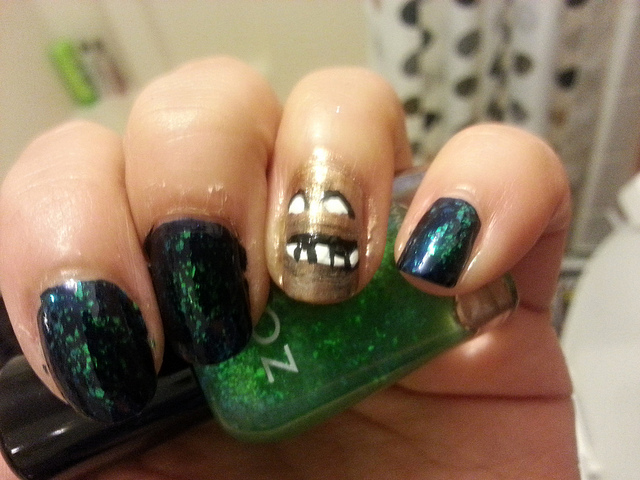
Technique 3: Freehand (pointer finger)
NOOOOOOOoooooooOOOOOO... such tiny brushes. So. Very. Tiny. And yet I still can't draw lines that don't look uneven and terrible. The nail mat comes in handy here again because you can paint a design several times on the mat, pick the best one, and transfer it to your nail. That still doesn't make up for my lack of artistic ability and resulting bitterness. That doesn't mean that I haven't had a few semi-successful attempts that I added below. The first is from our Batman Viewing Night event and the other I recently did for Easter.
One good tip I was given recently is that you don't have to use polish to paint the detail work. Invest in some acrylic paint and just make sure you cover it with a good top coat. Acrylic paint is not only thinner and easier to work with, but you can scrape off your mistakes with a toothpick.
Technique 4: Dotting tool (not pictured)
A dotting tool is just a tool with a small metal ball at the end. The metal ball is dipped in your polish and then lightly dabbed on your nail to create small dots. I like this tool because it doesn't take too much effort and looks pretty darn cute. Even if you are not the most creative nail designer out there, adding a few well placed dots can make things look a lot more complete. Best of all, you can order sets that are not only cheap, but come in different sizes. Variety is the spice of life...even if we are just talking about big vs small polka dots.
Technique 5: Water decals (not pictured)
The easiest way to describe these is to say that water decals are temporary tattoos for your nails. You cut them out, remove the clear covering, and apply them with water. After a few seconds, you can peel off the wet paper backing to leave the design behind on your nail. Let it dry, apply top coat or add some extra details, and you are good to go. I much prefer these over stickers because they are smooth and are easy to remove. My only warning about these is that not all water decals are created equal. Some aren't printed that well and can have muddy details, others don't adhere easily, and still others like to flake off or smudge when you apply your top coat. The good thing however is that are quite inexpensive, so you can try different brands or suppliers without breaking the bank. In my search to find the perfect decals, I have spend long hours on etsy checking out various decals that match my fandoms. I mean, if you can get decals of Channing Tatum's head, surely there have got to be some Venture Brothers decals out there somewhere. Right?
Anyone else out there a fan of nail art? Have any techniques to share? Just want to show off your latest masterpiece? Share your adventures in the comments section below.